in praise of slow!

Thank-you to: Matt Hunsberger
Danbury, CT

‘Even small steps in the right direction can add up and make a big difference in the long run. As long as you keep working toward your dreams and goals, even if it’s just a few minutes each day, you can achieve them.’

Have been feeling pretty disappointed in myself for the slow down in blogging!

Three children and the UK school Summer holidays are not conducive to writing!

I always have plans, ideas, targets spinning around my head…perhaps too many to focus upon and too many to realistically achieve!

By now I should have cleared out every cupboard in my house (3 out of 10 done!). I should also have been swimming and played tennis with my boys each week, produced a monthly meal plan, organised a back to school crafternoon and have a business plan for my vintage craft parties in place… I nearly forgot, I have to make 38 fabric diary covers for my boys’ school!

I am slow! I know I am slow, but I do need to achieve. I keep researching, researching, looking for suppliers for eco cutlery, for paper lanterns, for vintage china, the list goes on. I love the process but then when I get to the end of the day I do not feel that I have achieved very much at all.

The plan for the vintage craft parties is clear in my head, but I have not committed it to paper…big mistake!

I need to decide on my basic format and work on that…the quest for perfection means I am getting no-where fast! ( or in fact no-where slowly!).

Next week my boys are at sport’s camp from 10-3pm and I am planning to focus only on my work during this time; no washing, cooking, ironing, shopping, cleaning etc during these hours, just as if my kitchen table was in an office.

I want progress by the end of the week ( although Friday is my birthday, so perhaps a four day week is in order!)

Underlying my slowness is my fundamental difficulty with decision making…a life-time’s affliction ( could this be genetic, my eldest son suffers in the same way!).

Give me a date and a target and I am there, without this structure I play to my strengths and do research and ponder the merits of this and that.

Slow is positive if moving forward, but my slow sends me round and round in circles; if someone knocked on my door and asked me to plan and set up a party for 10 next weekend I could do it. However that is not going to happen and I need to make it happen…fast!

Thank-you for reading.

spray paint dreams…

[thumb_3164_0af2ca84e6a4f999bab097d625d55cf6.jpg]

Thank-you to : http://fatbuddhastore.blogspot.co.uk/2009/09/pantone-spray-paint.html

Just imagine if this was not just a concept but reality! As this image is from 2009, it would seem that Pantone spray paint may well remain just a dream.

I was inspired to investigate spray paint projects when the following arrived in my in box one morning:

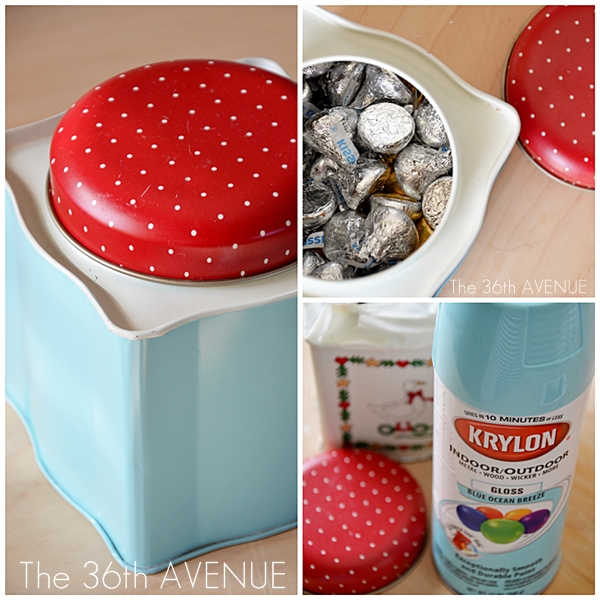
There have been so many times that I have passed over naff tins because I knew that covering them with paper wouldbe slow and painful! Spray paint is the answer!

I often spy baking tins too…no longer safe from my clutches!

Of course a major part of the success of these two projects has been the use of  Krylon spray paint.

An hour of fruitless internet searching led me precisely no-where…it appears this make is firmly an American beauty!

None-the -less I carried on searching for tips about spray painting techniques.

Thanks to Becky Higgins for the following pdf which gives loads of top tips for beginners:

http://www.beckyhiggins.com/blog/wp-content/uploads/2010/06/spray-painting-tips.pdf

Inspiratation is all around:

This was made for a baby’s nursery, and I can envisage something similar for craft storage.

After a little more investigation I came across something called Marabu Do-It Spray. This sounds like it covers a multitude of surfaces and comes in a wide range of colours:

Of course I will need to  road test it…

Thank-you for reading.

remake it: sewn pyramid paper pouch

A new series of posts using recycled and/or recyclable materials.

1. A gift pouch.

Inspired by a 1970’s fav! Not sure if these were/are peculiar to the UK?

So evocative of long, sunny, carefree days!

Lovely Jubbly!

I used  paper that was free in ‘Craft Seller’ (issue 13/August 212). This project would also be a great reuse of wrapping paper (although not really thin stuff!), and also old magazine pages;  something with some weight because of the sewing and to hold the final shape

I wanted to make a little sweet bag to give to one of the girls leaving sewing group this week; I enjoy machine sewing paper and  knew that this would be a quick project!

Fold a piece of A5 double sided paper in half, but without making a crease:

Next up sewing! I used a zig-zag stitch as when I used a running stitch the paper perforated too easily.

You should now have an open top pouch:

The pouches are now ready to be filled! I chose smarties!

The pouches could hold all sorts of things, including small gifts. I will be making some more for my boys to give out at school as thank-yous to the staff.

If putting in something like biscuits, then popping the biscuits inside a small glassine bag or wrapping them in greaseproof paper first will prevent staining the pretty paper!

The final stage is to sew up the pouches. This could be done by sewing straight across the top.

However, I like the ‘pyramid’ effect created by taking the side with the seam and ‘pushing’ it across to meet the opposite side of the pouch. The photo below will do a better job than me with this explanation!

Instead of sewing the sides of the pouch they could be closed with the use of washi tape for a pretty edging, or plain sticky tape.

I also think these would make lovely invitations; the invite itself could be printed onto the paper and thus hidden inside, or a slip of paper could be popped inside with all the party details.

I am sure that there are many more uses for pretty pyramid pouches!

Thank-you for reading

t-shirt monsters: week 2

It was week 2 of t-shirt monster making at the remakery this afternoon.

So lovely to see the girls…keen and raring to go!

Unfortunately we are going to need a third week to completly finish.

It’s something to consider when I plan the course for next term; I sense that they would prefer to finish one project each week, and certainly in two.

I will need to try to keep an eye out for projects that can be completed in an hour!

Speed sewing here we come!

Thank-you for reading.

polka dot peg doll

After many hours searching for red and white striped straws at an affordable price ( why are they so inflated?), I clearly had red and white fever!

This is one of those projects that came about without any real planning…just a desire to make something!

I hope that the following pictures and words are explanation enough should you wish to remake!

I used a transfer for the peg doll’s face, as I had some left over from previous peg doll makes!

Fine markers can be used to create a face full of personality with hair to match!

Once you have sewn to the end of the cup cake liner, pull your thread gently to ruffle up the skirt some more.

Place the peg doll into the centre of the ruffled liner, pull (gently!) to close around the peg and secure with a couple of stitches.

I decided to use embroidery thread in a contrasting colour to make a feature but it would be just as easy to use matching thread to avoid this.

This would make a simple summer project for a beginner sewer…the potential for variation is huge!

I have mine displayed on my bedside table: she makes me smile.

Thank-you for reading.

things to do?

Things to do

Thank-you to :

pizzazzerie.com

When I woke this morning I had plans to write a to do list for the weekend. The focus was to be my blog. To learn new things, to join new communities,  to follow new blogs…etc, etc, etc.

Well. after spending two hours on Facebook to set up a fan page and upload my picture I was done. I managed both tasks, but for something so simple it was so time consuming.

After finally realising that I needed to ‘add a page’ to promote the remakery as a separate entity from myself (I think this was what I needed to do, please correct me if I am wrong?!), I then had to subject myself to the task of uploading my personal photo.

I had previously created an image I was happy with via Gravator, and so aimed to upload this to Facebook.

Too simple…I found that this could not be done and so uploaded a photo that included my children (not my aim at all).

Facebook would not let me crop my photo, so I used pic monkey (my saviour). This has worked to a certain extent and I am happy with the final picture (no children), but I can’t seem to get rid of the original photo (with children) which is still displayed.

The problem is that I don’t understand how Facebook pages work…something definitely to work on!

This makes me feel a real failure, I have set up a blog, know how to use twitter but still struggle with Facebook…

Whilst searching for a pretty things to do list I came across this image below:

Thank-you to:

 prettypinktulips.com

This has now become the inspiration for my weekend to do list. The boys will on holiday from July 20th and I need a structure to ensure we make the most of our time together.

I am going to produce something similar to an advent calendar to enable me to plan a variety of activities and to create some memories of our time together.

Please let me know if you have any suggestions that have worked for you…my boys are five, and pretty much up for anything!

Thank-you for reading and have a good weekend.

a {t-shirt} monster mood board

  1. chezbeeperbebe.blogspot.com
  2. goddesshobbies.blogspot.co.uk
  3. sewfearless.com
  4. manifattive.blogspot.co.nz
  5. kidindependent.com
  6. blog.revoluzzza.com
At yesterday’s remakery sewing club, the girls and I tackled t-shirt monsters!
I decided to collate a mood board to introduce the concept and I took in some of my own children’s monster softies.
I wanted the girls to design their own creatures on paper first ( we used old brown paper which gave the process a realistic ‘designer’ feel).
The shapes were varied, and, by its’ very nature the project lent itself to simple outlines.
Fabric choice was next! Lots of old t-shirts were harmed in the making of these monsters!
I was really pleased to see the girls give their selections a lot of thought and they all decided to have a different colour for front and back.
Lots of lovely chat took place; I was particularly pleased that they related the making of the creatures to the making of their pin-cushions.
‘This is like the pin-cushions, we will sew the pieces together, turn them inside out and stuff them.’
Next week we will begin the process of adding features and in so doing will learn how to sew buttons, add patches and generally give each creature lots of personality!
vintage textile softies
This image, above, is amazing! I have spent a long time looking at it and spotting something new!
The simplicity is totally deceptive…this must have been quite a process, selecting, disgarding until the creator was finally happy.
Denise Litchfield is the artist.


http://www.grrlandog.com/press/

This article is so hard to read ( a little easier via the link). However it is worth squinting at, to gain an insight into Denise’s  process.

This would be perfect for me to have a go at…the combination of linen and Liberty would work particularly well!

Thank-you for reading.

reflections + revelations of a {very} new blogger

chick-hatching.jpg (448×298)

After posting 15 times over the last two weeks I am still feeling very out of my depth!

I believe that I have  a clear focus for my blog…I still do, but am struggling to convey that. At the moment I have more ideas than I know what to do with.

I want to be consistent, to be real and to be relevant. I want to build a {very} small business. I want to improve my blog’s appearence, I want to be part of Facebook, to be part of twitter, to be supportive of the blogging community.

I have just begun and yet I compare myself with very experienced bloggers.

To help myself with a reality check, today I looked at some of my favourite bloggers; I looked at what they posted in the first few weeks of starting their blogs.

If you haven’t done this already, then I urge you to do it NOW. It is a revelation; the best begin in much the same way as we all do. Tentative posts covering a variety of areas and often relying on the beautiful images of others…feeling their way into the job!

I am in no position to point directly at anyone’s first efforts; I looked at very successful blogs and wondered how they started. They did not begin with perfect, polished  posts. They began at the beginning and worked hard to develop their style and substance.

I am also trying to find time to read and comment on other people’s blogs; I have quickly realised that this is a way of getting your blog ‘out there’. I have discovered new to me blogs as a consequence of others liking and commenting on my posts, obviously this works both ways.

I was left wondering which blogs to comment upon; I follow many of the ‘big’ blogs but never feel confident enough to comment. After reading the following I may change my mind!

The Diva blogs are not necessarily any better than anyone else’s. Consider they just got to the senior playground first. Mingle with these bloggers, talk to them, comment on what they have to say. Let your blog stand shoulder to shoulder with them on the blogging red carpet. As I tell my children, quoting from Anthony Robbins, “People’s lives are a direct reflection of the expectations of their peer group.”

Staying solely in blog circles with low expectations or without the same aims, will affect the quality expectations you have for your blog. Aim higher!

And when we become fearful about moving forward (because more exposure will mean we are open to more scrutiny), remember – to avoid criticism we must say nothing, do nothing and be nothing.

http://www.hermelness.com/good-bloggers-common

Food for thought!

There are many, many articles offering advice for new bloggers, this one stuck with me! It seemed to pinpoint my fears and turn them into positives.

From http://bloggingwithamy.com/new-blogger-tips/

tips for new bloggers

1. You’re awesome

I mean that. Diving in to this blogging thing is no small feat. Be proud of yourself for becoming more technologically astute. I mean, how many other people do you know in real life who are starting blogs? See? You’re ahead.

2. There is a huge learning curve

We’ve all experienced it. It’s not just you, I promise. Take it slow. This is a marathon, not a sprint. I know it’s exciting at first, but when you start to feel a bit stumped, take a break and come back later. Otherwise, you’ll drive yourself nutso. (Ask me how I know.)

3. Google is your (best) friend

I’m bummed I can’t help all of you who email me with questions. But honestly? A lot of the time, I just google an answer for you anyway. That’s my little secret. :) Do it enough an you’ll eventually become a googling ninja and then you can figure out just about anything. (And here’s what I do when I get errors and warnings.)

4. As a new blogger, you’ve got (at least) one advantage

Now don’t take this the wrong way.  I know we all want to be a lot further down the road than we are.  But you are where you are, so embrace it. Don’t get caught up in having everything “just so” or making sure everything is “just right.” One of the greatest things about starting a blog is that you can make all kinds of mistakes and it doesn’t matter because no one is reading it yet anyway. Sure, you could focus on the fact that you don’t have a lot of followers at the beginning. Or you could focus on the fact that you have a lot of freedom. It’s all about perspective.

However, when I consider what I wish to achieve in the blogging world ( as in the real world) the following summarizes  my overiding purpose:

be that girl...

http://imgfave.com/view/1091791

Thank-you for reading and have a good weekend.

needle books + ruffles= the remakery

Each week at the remakery I make a table centrepiece; this week I decided to make a crepe paper ruffle!

Using the tutorial from

http://www.danamadeit.com/2011/05/tutorial-ruffled-streamers.html

The ruffle was easy and quick to sew. Dana’s instructions regarding tension and stitch length were spot on! I did also (as she suggested) hold on to the thread whilst stitching and this really made effective ruffles!

The girls at the remakery loved the ruffle…using it as a headdress and scarf as well as for the intended table decor!

This week we focused on making needle books. The girls chose their own fabrics and used templates to cut out the correct sizes.

Using a simple running stitch down the centre of both pieces of fabric created a needle book!

A piece of ribbon was sewn securely at either end to tie the book together, and the girls proudly displayed a selection of pins and their sewing needle!

I was impressed with how carefully they made their fabric and ribbon selections; for them this was very important!

I also realised, that for them, the work before the actual sewing does not equate with the precision that they want!

I don’t think that ‘perfect’ is important, but they do, and so are often disappointed if their cutting is a little wonky or their stitches are not ‘neat’.

It is a thin line between stressing the importance of the preparation and the importance of creativity, individuality and fun!

I do also recognise that success breeds enjoyment and encourages us to ‘have a go’ at the next project. This is why I want my sewing groups to be about creating an end product and not a series of ‘lessons’.

For next week’s session I let the girls choose between a t-shirt monster, an apron and a bag.

The overwhelming answer was a t-shirt monster…can’t wait…a chance for some real individuality with this kind of project!

Thank-you for reading.

liberty and linen

As promised yesterday I am sharing images of the final stages of my diary covers.

Above is the finished product from the front, below is the inside view

On the whole I am fairly pleased with the finished result; I am always happy with a Liberty and linen fabric combination!

I used the tutorial from http://bloomandblossom.blogspot.co.uk/2009/02/journal-cover-tutorial.html.

I found the instructions and images very clear and easy to follow…although I was very slow!

The only thing I changed was the seam allowances; I just find it so difficult to sew .25 inch (6mm) seam so I increased it to .5 inches (12mm)

I am certainly going to have to speed up (hugely) if I am to make 38 of these.

I guess setting up a ‘production line’ would be the best option, and making a template so that I do not have to measure everything 38 times!

I am also thinking of making the covers in one piece and adding a fabric embellishment to the front, rather than this construction which uses two pieces of linen and one piece of cotton. This would save time and would also be more forgiving of errors!

I hope my very important person likes them; I delivered them to his office today…time will tell!

Tomorrow is the third session of the remakery sewing club. We will be making needle books…I am determined to take some photos this week, I haven’t found time in the last two sessions.